Skip to content
adatum
  • Home
  •  About adatum
  •  Learn Azure Bicep
  •  SCOM Web API
Automation

Remediate Azure Policy with PowerShell

  • 11/06/202011/06/2020
  • by Martin Ehrnst

Azure Policy is there to help us with properly governed and secure infrastructure. However, Azure Policy requires management as well.

Lately, I have built a new set of policies to ensure diagnostic logs are forwarded to Azure Monitor Logs. Multiple policies and a policy initiative were deployed to multiple subscriptions and multiple customers. All this was made possible since we manage through Azure Lighthouse.

Automatic remediation of Azure Policy

The challenge faced after deploying the policy was how to remediate them. Since policies with effect ‘deployIfNotExists’ only apply to new or modified resources, I faced the job with clicking in the portal or figure out a way to do this with PowerShell.
I actually started with the portal, as I thought it would be a quick job. After doing one or two subscriptions I realized how much time I would use.

Azure policy compliance state

Given the fact that the imitative it self contained around 50 individual policies, and at the time 19 subscriptions. I figured spending some time in PowerShell was well worth it. There is also a pretty good chance I will find my self in the same situation pretty soon.

Create remediation task with PowerShell

To create a remediation task for a policy set you can use this script. It will connect to your subscription and get all non-compliant policies. Then start a policy remediation task for the individual policies.

Summary

Policies with effect “deployIfNotExist” only work for resources that are updated or created after the policy was applied. To remediate existing resources you will have to create the remediation tasks manually through the portal, or by using PowerShell (and REST API)

By the way, fellow Azure MVP Tao Yang has created everything you need in order to enable these policies your self. Please see GitHub for complete ARM templates. And please help him maintain everything by contributing.

Share this:

  • LinkedIn
  • Twitter
  • Reddit
Automation

Multi subscription deployment with DevOps and Azure Lighthouse

  • 11/03/202003/09/2020
  • by Martin Ehrnst

Companies today are rapidly adopting new technology. Adding more pressure on the companies IT-department or the service provider. No matter where the workload runs, governance, security, and deployments are fundamental parts.
Azure Lighthouse came last year, and while it solves a lot of our trouble. Multi subscription deployments aren’t one of them – but it sure makes it more possible!

Azure deployments with Azure DevOps

One of the things that make service providers great at what they do is standardization. For example; making sure all subscriptions (customers in many cases) have the same set of baseline Azure policies.

Azure DevOps has multiple ways to deploy resources in Azure or other places. How do we deploy the same Azure template to multiple subscriptions using the same pipeline? In our case, I solved this with some existing features, forward-thinking and PowerShell magic.

Azure DevOps service connection with Azure Lighthouse

Multi subscription deployments with Azure DevOps is not a built-in feature. With Azure Lighthouse it became a little bit easier but will require some work.

First, you must set up a service connection and allow that to access one of your internal subscriptions. In Azure DevOps service connections are bound to one subscription.

For this service connection to be capable of multi subscription deployments, it will need access to your customer’s subscriptions. This can be solved through delegated resource management and Azure Lighthouse.
In my case, I had a group with contributor access. And I could add the SPN to that group. Otherwise, you will have to update your current delegation.

Repository structure

Everything you need, including a YAML pipeline is available on GitHub, but I will walk you through how and why I set it up.

I needed to create not only a solution to deploy one resource to multiple subscriptions. I also needed to deploy multiple ARM templates.

For this purpose, I had the option to create one large PowerShell script with complex logic. Or, I could reuse the same script for every deployment. I chose option two. My code repository now looks something like this

  • ARM-Templates (folder)
    • storage-Account (folder)
      • azuredeploy.json
      • azuredeploy.parameters.json
      • deploy.ps1
    • another-resource (folder)
      • azuredeploy.json
      • azuredeploy.parameters.json
      • deploy.ps1
    • […]
  • azure-pipelines.yaml

PowerShell magic?

In regular deployments, we can use built-in tasks in the pipeline and deploy directly. For multi subscription deployment, PowerShell is my weapon of choice.

To people with PowerShell competency. The script used is fairly simple;

  1. Connect to Azure
  2. Retrieve the subscriptions
  3. Iterate and deploy the ARM template(s) to each customer subscriptions.

Below is a short example. Showing the core in my deployment script (deploy.ps1)

$deploymentName = "Multi-sub-deployment"
$deploymentLocation = "westeurope"
$templateFile = ".ARM-Templatesstorage-Accountazuredeploy.json"
$templateParameterFile = ".ARM-Templatesstorage-Accountazuredeploy.parameters.json"

# getting all subscriptions
$subscriptions = Get-AzSubscription | Where-Object { $_.Id -NotIn $excludedSubs }

foreach ($subscription in $subscriptions) {
        
    # set context to the current subscription
    $subscriptionId = $subscription.id
    Set-AzContext -SubscriptionId $subscriptionId

    # deploy the arm template
    New-AzSubscriptionDeployment -Name $deploymentName -Location $deploymentLocation `
        -TemplateParameterFile $templateParameterFile -TemplateFile $templateFile
}

Multi subscription deployment, build pipeline

Although my repository contains a YAML pipeline, you don’t have to use it. To be honest, I’m not sure I like them. I used too much time trying to wrap my head around it. And at this point, it seems unfinished from the Azure DevOps side. Therefore, I will show you how to set up your pipeline to support multi subscription deployments using the classic method.

azure pipeline template selector

kick off with the classic mode, and chose the empty job on the template page. We could probably discuss if we even need multiple pipelines for this. But it doesn’t hurt, and it will be easier for the next person if we do this by the book.

For the build pipeline, I am renaming my job to something meaningful, and add one single task. Publish pipeline artifact

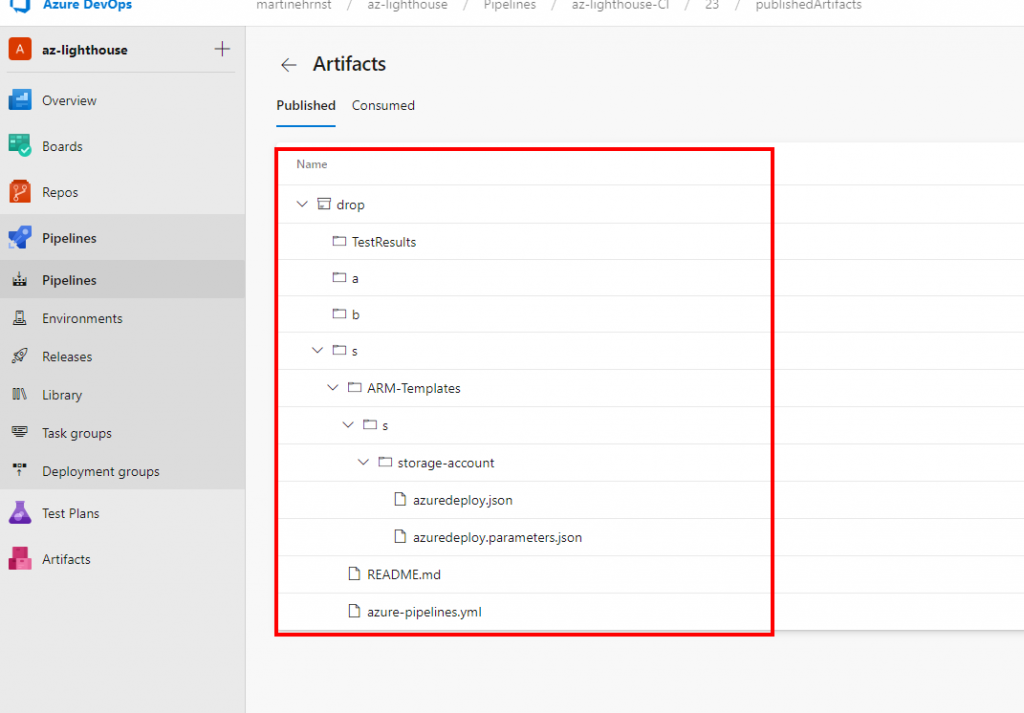
After you save and run the build. An artifact should be produced. The result should look something like this

Azure pipeline artifact

Multi subscription deployment, release pipeline

After a successful build (or in this case copy files), it is time to create our release pipeline. When using YAML, the two pipelines are combined. Not at all confusing for someone like me, who not that many months ago, didn’t know anything at all about this stuff.

Once again, I start off with an empty job, before I add my artifact from my build pipeline. I also renamed the first stage to “resource deployment”.

Now it’s the matter of adding tasks to our job, and it’s here you will need the service connection that you added earlier. The task we are working with is the Azure PowerShell task. And for multi subscription deployment, it is the only task you’ll need. Below is my task configuration

For some reason, it takes a few tries before pipelines want to work. It might be because of lat hours, or a law created by some guy named Murphy. Anyway, once it’s up and running you shole be able to see something similar to my output below;

2020-03-10T17:13:12.2503976Z ## Az module initialization Complete
2020-03-10T17:13:12.2517976Z ## Beginning Script Execution
2020-03-10T17:13:12.2532801Z Generating script.
2020-03-10T17:13:12.3293381Z ========================== Starting Command Output ===========================
2020-03-10T17:13:12.3416275Z ##[command]"C:Program FilesPowerShell6pwsh.exe" -NoLogo -NoProfile -NonInteractive -ExecutionPolicy Unrestricted -Command ". 'd:a_temp112fe6df-8ee0-4a10-b53e-5694a4d34b0f.ps1'"
2020-03-10T17:13:25.0914923Z No subscription specified. Deploying to all subscriptions
2020-03-10T17:13:25.2151812Z 
2020-03-10T17:13:25.2211374Z Name                                     Account             SubscriptionName    Environment         TenantId
2020-03-10T17:13:25.2292766Z ----                                     -------             ----------------    -----------         --------
2020-03-10T17:13:25.2300155Z MVP-Sponsorship (6dca9329-fb22-46cb-826…  MVP-Sponsorship     AzureCloud          22046864-98a9-4a9…
2020-03-10T17:14:01.7100820Z 
2020-03-10T17:14:01.7151741Z Id                      : /subscriptions/6dca9329-fb22-46cb-826c-/providers/Microsoft.Resources/deployments
2020-03-10T17:14:01.7152947Z                           /Multi-sub-deployment
2020-03-10T17:14:01.7154721Z Location                : westeurope
2020-03-10T17:14:01.7159918Z ManagementGroupId       : 
2020-03-10T17:14:01.7161790Z ResourceGroupName       : 
2020-03-10T17:14:01.7162557Z OnErrorDeployment       : 
2020-03-10T17:14:01.7163149Z DeploymentName          : Multi-sub-deployment
2020-03-10T17:14:01.7163805Z CorrelationId           : d49c10f8-0260-49d5-aa8d-08a41591d1a7
2020-03-10T17:14:01.7164463Z ProvisioningState       : Succeeded
2020-03-10T17:14:01.7165107Z Timestamp               : 3/10/2020 5:14:00 PM
2020-03-10T17:14:01.7166059Z Mode                    : Incremental
2020-03-10T17:14:01.7166610Z TemplateLink            : 
2020-03-10T17:14:01.7167216Z TemplateLinkString      : 
2020-03-10T17:14:01.7167793Z DeploymentDebugLogLevel : 
2020-03-10T17:14:01.7168836Z Parameters              : {[rgName, Microsoft.Azure.Commands.ResourceManager.Cmdlets.SdkModels.DeploymentVariable], 
2020-03-10T17:14:01.7169800Z                           [location, Microsoft.Azure.Commands.ResourceManager.Cmdlets.SdkModels.DeploymentVariable], 
2020-03-10T17:14:01.7173723Z                           [storagePrefix, 
2020-03-10T17:14:01.7174379Z                           Microsoft.Azure.Commands.ResourceManager.Cmdlets.SdkModels.DeploymentVariable]}
2020-03-10T17:14:01.7175014Z ParametersString        : 
2020-03-10T17:14:01.7177870Z                           Name             Type                       Value     
2020-03-10T17:14:01.7178513Z                           ===============  =========================  ==========
2020-03-10T17:14:01.7179228Z                           rgName           String                     adatum    
2020-03-10T17:14:01.7179831Z                           location         String                     westeurope
2020-03-10T17:14:01.7180452Z                           storagePrefix    String                     str       
2020-03-10T17:14:01.7181006Z                           
2020-03-10T17:14:01.7181454Z Outputs                 : {}
2020-03-10T17:14:01.7181916Z OutputsString           : 
2020-03-10T17:14:01.7182291Z 
2020-03-10T17:14:02.0220641Z 
2020-03-10T17:14:02.0937716Z ##[command]Disconnect-AzAccount -Scope Process -ErrorAction Stop

If you look at the output, you can see that the script set’s context to a subscription, and that there is no subscription specified in the pipeline.

Multi subscription deployment summary

Multi subscription deployments with Azure DevOps is not available as a default. But with a little bit of PowerShell trickery, you got a great solution. For service providers and large enterprises, Azure Lighthouse is now a preferred way to manage resources.

By granting a service principal access to your customer subscriptions (or internal for that matter), and use this SPN as a service connection in your Azure Pipeline. You can use PowerShell to iterate through each subscription and deploy the resources needed.

The beauty with this is that it will work regardless of where your DevOps environment is hosted. You can have separate tenants for Lighthouse, Azure DevOps and workplace.

This post described the following, which is required for multi subscription deployment to work.

  • Created an SPN in the management tenant
  • Authorized the service principal through Azure Lighthouse
  • Created a repository and added our scripts and templates to it
  • Created pipelines and used the SPN as our service connection
  • Used PowerShell and the built-in task to iterate through each subscription and perform deployments.

Share this:

  • LinkedIn
  • Twitter
  • Reddit
Automation

Using Azure pipelines to deploy ARM templates

  • 27/02/201903/09/2020
  • by Martin Ehrnst

There are many reasons that you would use an Azure Resource Manager (ARM) template to deploy your Azure resources. And there’s equally many ways to deploy this kind of template.

For simple one time deployments of Azure resources I tend to use PowerShell or AZ CLI, but lately I have ben busy trying to create a web api based on Azure Functions using C# and .NET core. For those who know me, that’s not straight foreward.
To make things even more diffucult, I wanted to use Azure DevOps and Pipelines to build and push my code. In order to do that, I had to have some infrastructure in place, so why wouldn’t I use Azure Pipelines to deploy the ARM template as well?

Create ARM template

In order to deploy Azure Resource Manager templates, you will need to create one. ARM templates are based on Json and follows a schema. This schema or rule set if you like, defines how you must structure your template.

There are two forms of deployment options. At a resource group level (most common) and subscription level deployment. Both uses the same kind of Json language but have two different schemas. You’ll find the current resource group deployment schema here (no need to read :))

If you are unfamiliar with Json and ARM templates I recommend you to read Microsofts official documentation and getting started guide which will show how you can find the template from an existing deployment or create a new.

For reference, this is a simple template to deploy a web app, that I copied from Microsofts GitHub repo with a bunch of templates to get you started.

Adding ARM template along with your code

As I already mentioned deploy ARM template in a pipeline makes sense in many ways, especially if you have developed an application. This way you can control the infrastructure along side the code.

My Azure Function uses Cosmos DB and Key Vault as parts of it’s infrastructure. It is all developed in Visual Studio Code, and the whole thing is cutting edge for an old operations guy like me.

In the picture below you’ll see that I have structured my project in to two subfolders. One is holding the ARM templates, and the other one is for the acutal functions code. I did this so i would be able to chose artifacts from the build process in Azure DevOps pipelines. There might be a better way, but when i had everything in the same folder the templates was packed with the code and not available in deployment pipeline.

vscode function project with arm template folder

Set up the build pipeline

Not long ago I learned that there are two types of pipelines. Build pipelines and release pipelines. Build is used to pack up or actually build the application (same as pressing f5 in Visual Studio). Where release are used for pushing the application on to your infrastructure (and deploy the infra).

For reference. In Azure DevOps, my folder structure looks exactly the same

Next move over to pipelines and create a new release pipeline. From here chose your repository (I use Azure repos).

After chosing your repo, ou can chose to start from a template. My project is a .NET core application and I had no idea what was needed to build that, so a template worked nicely. Here you can chose what’s best for you’re project. The important pieces from an ARM template perspective comes in the next steps

Start out by filling in the obvious. A name and a server to do the build. In my case i run with Azure hosted 2017. In an on premises environment I would use private servers.

Add your templates as build artifacts

What you will need to do next is to take those Json files in your arm template catalog, and make them available as part of the build. You will have to add in a “Copy files” step and fill in a few properties. Pay attention to where I chose the source folder and the destination folder which have a variable reference, $(build.artifactstagingdirectory)/arm

Now. Hit save and queue. This will save your new (or edited pipeline) and start a build of your project.

By now you should also have a build running, and if you’re like me, exploring new stuff, you get used to this

Axure pipelines failed build publish

In this particular error. The publish task for .NET core is missing www root folder. By trial and error I found that I had to make a few changes to my build pipeline. This is not a prerequisite for running ARM templates with Azure pipelines, but i figured I should add in everything I had to do for this project, both for my reference and for yours if needed.

I removed “publish web projects” as i don’t have an ordinary web project, but an Azure function based API.

When you remove this tick, the task will refere to your project file (.CSPROJ).


Here i should give a shout out to my trusty colleague Emil Kjelsrud for helping out, once again.

Hit save and queue once again. Voila!

Configure the release pipeline with ARM templates

When your build is successful, we’re close to launch our application on to Azure. We do that by configuring a release pipeline. It is possible to combine the two, but I like them separated.

Under Pipelines > Releases hit new. A new wizard will pop up. Either chose one that fit your purpose, or start from scratch. In my case I chose to start with app service deployment. One of the first things you notice is “some settings need attention.”

Required settings in this context are the connection to your Azure environment and subscription. You will need to configure this in order to continue. There are several methods available for connecting your pipelines to Azure. I have my pipeline deploying resources in a tenant and subscription that my user does not have access to. That configuration requires a SPN/App registration in Azure AD with the correct permissions.

After configuring your connection. Modify your pipeline by adding in your required Azure Resource Group Deployment tasks. Here comes a few important bits. Prior to setting up my pipeline, I have a resource group created already. If you want to have the resource group created during deployment. You can use the Azure CLI or Azure powershell tasks (or a template) to do so.

Continue to fill in the required parameters. Remember that I separated my application code and the templates in to separate folders? This is why. I can now chose from the same artifact what i want to deploy, as the build pipeline have them available in their respective folders. Chose the template and your parameters file.

In this Azure DevOps environment we have an extension available that parses all outputs from your ARM templates. This way I can use variables from the previous step in my app service deployment. If you dont have this extension available, you can achieve the same result using PowerShell

Create the release

You’re pipeline is now complete. Save and create a release, the pipeline should now pick up the latest build and deploy your code to Azure. You can follow the whole process in Azure, under resource group > deployment and in Azure DevOps

After a few minutes (or seconds) depending on your configuration, you should have both your infrastructure and the actual application available.

Final thoughts

While I understand many of the concepts around infrastructure as code, continious integration and so on, I don’t always use the correct terms, so thank you for reading.

I hope you also have a greater understanding around the concepts, and also how you can utilize the possibilities available. My thoughts working with projects like this is always bound to the operational side. I know I’m going to use more ARM templates in Azure Pipelines, but probably not along side the actual code, as that’s not my day-to-day work. Again, I see my self working more and more with these Dev tools, and thats why I like to say that this is how we do modern Ops.

I leared a few more tips and tricks during this small project, so expect a few more posts soon.

Share this:

  • LinkedIn
  • Twitter
  • Reddit

Posts navigation

1 2 3 … 6

Popular blog posts

  • Azure Application registrations, Enterprise Apps, and managed identities
  • SCOM 1801 REST API Interfaces
  • Creating Azure AD Application using Powershell
  • Automate Azure DevOps like a boss
  • Access to Blob storage using Managed Identity in Logic Apps - by Nadeem Ahamed

Categories

Automation Azure Azure Active Directory Azure Bicep Azure DevOps Azure Functions Azure Lighthouse Azure Logic Apps Azure Monitor Azure Policy Community Conferences CSP Monitoring DevOps Guest blogs Infrastructure As Code Microsoft CSP MPAuthoring OMS Operations Manager Podcast Powershell Uncategorised Windows Admin Center Windows Server

Follow Martin Ehrnst

  • Twitter
  • LinkedIn

RSS feed RSS - Posts

RSS feed RSS - Comments

Microsoft Azure MVP

Martin Ehrnst Microsoft Azure MVP
Adatum.no use cookies to ensure that we give you the best experience on our website. If you continue to use this site we will assume that you are happy with it. Cookie Policy
Theme by Colorlib Powered by WordPress