Serverless application with PowerShell: Azure Functions
In part two we will integrate Azure Functions using Powershell triggered by Event Grid to complete the circle in our application infrastructure. If you havent read the previous parts in this blog series, i recommend you start with the introducution.
Azure Functions, what?
Azure’s serverless flagship probably don’t need any introduction at this stage, but in short. Azure Functions allows you to run code or scripts on demand triggered via various sources. Timer triggers, event, webhooks, http post, gets etc. The most common way to run your stuff is by consumption where your code run on spare compute in azure at a very low-cost. If you demand more power, you can also opt in for the app service plan.
Read more about functions and how to get started here.
FYI; the same type of service from AWS is called Lambda and Google offers similar with Cloud Functions
Powershell support
Powershell support in Azure Functions is still in preview, but I have used it many times, without issues. It is slower that all the other languages supported, but that doesent matter in this case. But be aware that azure functions Powershell run in v4. If you want to run C# or Java feel free to do so.
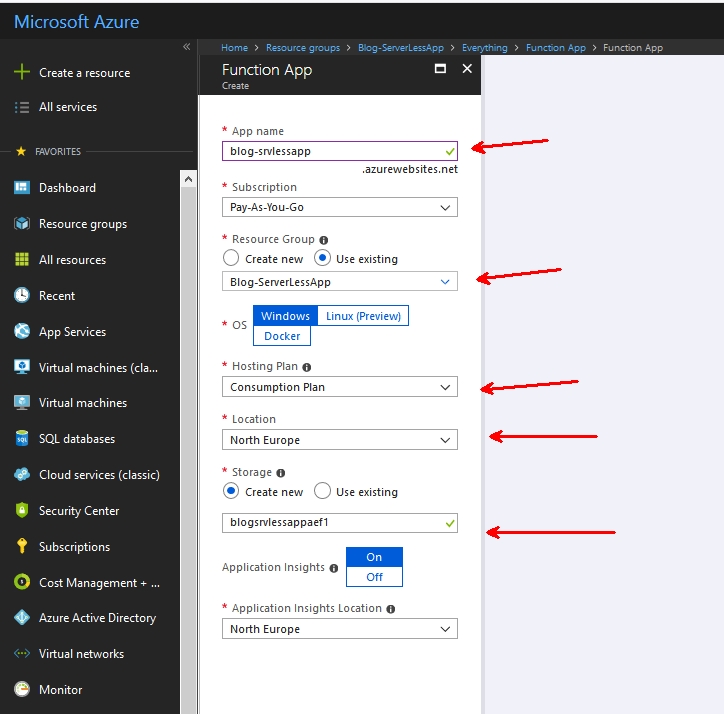
Let’s start by adding a new function app. Things to notice is that the name of your function app, is also the DNS name. App insights is on by default, and I have no idea why you would want to chose OS type. This wasn’t here before…
without wasting too much of your time reading a lot of fill text, lets just create a new function. Remember to enable ‘experimental language support’ this will magically allow Powershell support (among others). Chose the HTTP trigger Powershell.

I am naming my first function “incoming-pizza-order” which we will add the code to and connect to Event Grid.

After creation you will have a function that supports GET and POST request with your name as the input. A “hello world” type of example. Let’s see if we can trigger this from Event Grid. As we did in the previous post. Create a new Event Grid subscription.

Failure, right? Let’s take a look.
Validating event grid subscriptions
Azure event grid accepts all incoming events and will pass them on to any subscribers. To add a layer of security you will have to validate the subscription upon creation. So all subscribers, weather it’s your own incoming webhook solution on premises or in a another cloud, will have to sort of handshake before it creates the subscription. As you see, the error message in Azure isn’t very good, and I searched quite a long time before I reached out to Ling Toh via Twitter. Luckily she pointed me in the right direction.
Upon creation event grid sends a validation request to the subscriber, which looks something like this:
[{

"id": "2d1781af-3a4c-4d7c-bd0c-e34b19da4e66",

"topic": "/subscriptions/xxxxxxxx-xxxx-xxxx-xxxx-xxxxxxxxxxxx",

"subject": "",

"data": {

"validationCode": "512d38b6-c7b8-40c8-89fe-f46f9e9622b6",

"validationUrl": "https://rp-eastus2.eventgrid.azure.net:553/eventsubscriptions/estest/validate?id=B2E34264-7D71-453A-B5FB-B62D0FDC85EE&t=2018-04-26T20:30:54.4538837Z&apiVersion=2018-05-01-preview&token=1BNqCxBBSSE9OnNSfZM4%2b5H9zDegKMY6uJ%2fO2DFRkwQ%3d"

},

"eventType": "Microsoft.EventGrid.SubscriptionValidationEvent",

"eventTime": "2018-01-25T22:12:19.4556811Z",

"metadataVersion": "1",

"dataVersion": "1"

}]
We will have to return a successful HTTP response (HTTP 200 OK) with the validation code under the property, “validationResponse”
{

"validationResponse": "512d38b6-c7b8-40c8-89fe-f46f9e9622b6"

}
All this is described in Microsofts documentation, but how do we do this in a Powershell function? Here’s my modified version of the “hello world/name” example. As you see it grabs the post requests and if it is a validation event from Event Grid it will return an http 200 and the validation response. Copy the entire script in to your function and re-create the subscription in event grid.
Hopefully the subscription registered successfully. Time to play!
Grab the code example from part 1 and fire off an event, in the matter of seconds your function will fire. You can confirm that it’s working by looking at the log and output.

How cool isn’t this? I love that we can use our Ops skills and create true serverless, modern application infrastructure.
What’s next for our Pizza order example?
In my next post, I will share a few more code examples with multiple Azure Functions, sending events through event grid, from the introduction you know that these are the steps:
- Customer creates/orders a pizza online
- Send orderdata to event grid
- Azure function subscribe to the “new order” event
- Create a new event when pizza is in oven
- Post new event when pizza is cooked and ready for delivery
- Create a new event when pizza is sent to customer.
PS: I would like to create a simple GUI at some point, what tools should I use? I’m thinking either Powershell Universal Dashboard by Adam Driscoll or PowerApps. If you have other suggestions, let me know.


