Skip to content
adatum
  • Home
  •  About adatum
  •  Learn Azure Bicep
  •  SCOM Web API
Azure Bicep

Share Bicep modules with private registry

  • 08/11/202107/01/2025
  • by Martin Ehrnst

A common problem for many organizations is to share and consume infrastructure templates. Many ended up with a storage account in Azure, but that had some limitations around versioning and sharing of secrets. Directly consuming templates from a Git repository is another option. However, that’s not exactly problem-free either. For example, what happens if a colleague makes changes, and you reference the template without knowing what has changed. In the best case, a missing parameter will fail your pipeline. In the worst case, you have downtime.

The key concept of having Bicep modules in a common store is for everyone inside your organisation to use these modules when they’re provisioning infrastructure. Picture this scenario. Multiple development team is often using the same type of resource, like Azure SQL, Azure Functions, storage accounts, etc. Your organization likely have a few governance rules applied. Like tagging strategy, allowed SKU, different configuration for test and production and so on. Pre-created and easially consumable modules taking care of this is what you need. Azure Container Registry for Bicep files is now available.

Azure Bicep private registry

With Azure bicep version 0.4.1008 you have a built-in option to publish your Bicep modules to a private registry. The private registry is not a new resource type, in fact, you are uploading your Bicep files to Azure Container Registry which allows you to leverage versioning which will make sure you do not break templates for everyone each time people make changes. Once your Bicep module is uploaded to ACR everyone with permission to pull images can use your modules.

Azure bicep private registry

Upload Bicep modules to ACR

A shared bicep module is used in the same way as a local module, but instead of the local path, you specify the URL and version of the file within the registry. More on that later.

Assuming you already have one Bicep module or a set of them, you only need to provision a container registry. To push the “image” you need acrPush permissions and to consume you need acrPull. Below is the syntax used for uploading a bicep file to ACR.

az bicep publish storage.bicep --target br:exampleregistry.azurecr.io/bicep/modules/storage:v1

I am using this code base against my existing registry, so my command to upload is as follows;

bicep publish .\Bicep\3.modules\sql.bicep --target "br:acrbicepehrnst.azurecr.io/modules/azuresql/sql:v0.1"

No response is given on successful upload, but to make sure everything is alright we can confirm with this PowerShell command, which will list all repositories in your registry.

upload Bicep module to Private registry
Get-AzContainerRegistryRepository -RegistryName acrbicepehrnst

Using modules from the registry

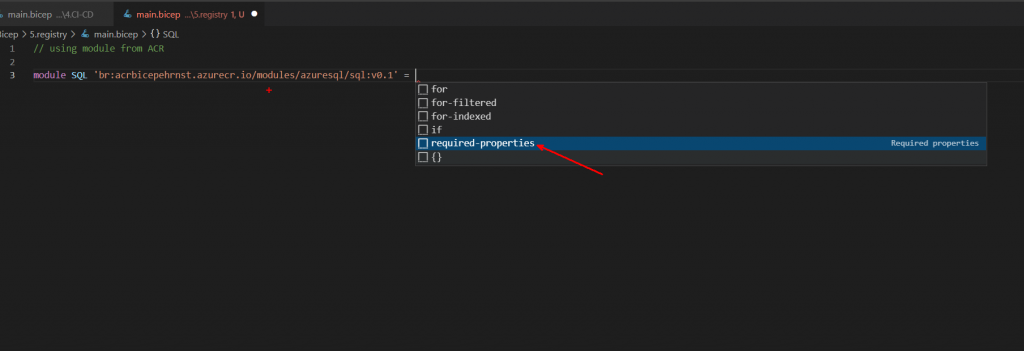
Including modules from a private registry is as easy as using local modules. With Bicep extension enabled in VSCode, you also get validation of the remote modules.

pssst… if you by any change use EMACS you can have the same through LSP and Bicep Lang server

upload Bicep module to Private registry - syntax highlight
var tags = {
  'owner': 'Martin Ehrnst'
  'purpose': 'Bicep demo'
}

module SQL 'br:acrbicepehrnst.azurecr.io/modules/azuresql/sql:v0.1' = {
  name: 'sqlDeploy'
  params: {
    databaseName: 'moduletest'
    dbAdId: '8776fb6e-5de0-408c-be03-c17a67b079d0'
    dbAdLoginName: 'name@company.com'
    env: 'prod'
    tags: tags
  }
}

Summary

In this post I have showed you the core concept, how you upload and how you consume the modules. To me this is only half the story. In my next post I will go through how we can put everything inside a pipeline and add a better versioning to the modules.
Azure Bicep private registry is probably here to stay. Upuntil now it is the best solution to share infrastructure templates within an organization.

Share this:

  • Click to share on LinkedIn (Opens in new window) LinkedIn
  • Click to share on X (Opens in new window) X
  • Click to share on Reddit (Opens in new window) Reddit
Azure DevOps

Automate Azure DevOps like a boss

  • 23/06/202107/01/2025
  • by Martin Ehrnst

Over the past weeks, I have worked on automation within Azure DevOps. One of the tasks was to create a self-service tool for our developers to create new projects where all pre-requisites were taken care of. That means the project itself, service connections (ARM) to access our Azure Kubernetes Service (AKS), Azure AD groups for accessing the project, and so on.

For the Azure AD part, I had mostly everything in place already. Service connections for Azure AD are essentially Azure application registrations, and Azure AD groups are easily created using New-AzADGroup or Microsoft Graph API. However, my experience with Azure DevOps API was and still is limited.

Creating the project

Creating the project itself is pretty straightforward. Below is a PowerShell snippet to do so. I used a service account and a Personal Access Token (PAT) with the following access permissions to do everything in my code.

  • Graph, read/manage
  • Identity, read/manage
  • Member Entitlement Management, read/write
  • Project and team, read/write/manage
  • Security, manage
  • Service connections, read/manage/query

Assigning permissions using Azure DevOps API

You don’t get far with just a project. Someone needs to have access to it as well. Since I try to create a paved road for the DevOps users I needed to add users to the DevOps groups inside the project. Here I spent some significant time, trying to understand how. In my routine, I already create three AAD groups for Project Administrators, contributors, and readers. We want to have one single pane for managing access to company resources, and Azure AD is the place.

In my opinion, access control in Azure DevOps is a nightmare, but lets not focus on that. I want to add each AAD group in to it’s corresponding Azure DevOps group.

To do that you use Azure DevOps Graph and the Groups endpoints. What you can see in the Microsoft example is that you need to perform a post operation against https://vssps.dev.azure.com/{organization}/_apis/graph/groups?groupDescriptors=vssgp.Uy0xLTktMTU1MTM3NDI0NS0yMTc2MDU2ODQ4LTMyODAwNzczODUtMjM4NDQzMDA4Mi0yNTc3Njk3NTA4LTEtNzM0NDQ1NzM2LTQwNzkyNzIyNjgtMzA0NzY5MjIyMy0yMjg2NTY0ODM0&api-version=6.1-preview.1

Azure DevOps Descriptor

From the documentation, you can see the request to add AAD groups into a project group like Project Administrators you need to specify a groupDescriptor. I could not find any good information on how to get this information, and as you can see, the request does not specify the project, only at the organization level.

Now, after some digging, I figured I could fetch this information with some additional calls to the API.

  1. Get your project descriptor, by using the projectId as your descriptor…
  2. Get all groups within the project, using the actual project descriptor
  3. Filter the groups you want from the above request
  4. Pass the Azure AD group objectId in the body and POST against /graph/groups?groupDescriptors=

Modify Azure DevOps project features

In our case, we do not use all features in Azure DevOps. I, therefore, wanted to turn off some features like boards. Making it a bit more difficult for our developers to start using features that we have other tools to support. I couldn’t find any official endpoint documented, so I reached out on Twitter to get inputs. Of course fellow MVP Rob Bos had some time to inspect the portal calls and came up with the solution. Basically, after the project is created, you need to make additional calls to an old API to flip the switch for each feature you do not use.

Adding ARM service connections to project using DevOps API

This part is quite well documented. So after creating the app registrations and service principals in Azure AD. You need to create the service connection(s) in the project. In my case I had more than one service connection, so I had to run this snippet multiple times, as I could not find a batch operation for it.

I think that pre-provisioning of the service connections are a good idea. This feature is quite complex to grasp for many, as the built in wizard cause more confusion than it helps. Especially when the users try to create a new SC, and they do not have access to create App registrations in Azure, or to set permissions on the subscription. Then the entire wizard will fail, but you might end up with ghost SPNs in Azure…

I said it was properly documented, but if you take a close look. The endpoint is called servicendpoint and not serviceconnection which is what it is called in the portal.

Automation solutions for Azure DevOps

In my examples I use the native Azure DevOps APIs and PowerShell. This worked best in our solution. However, you can also use Azure CLI or Azure DevOps provider for Terraform.

Since we do not use Terraform for any IAC, I weren’t keen to start using it just for Azure DevOps. Azure CLI have some limitations since it only allow interactive login, or a semi-solution for the PAT. I suggest you see what solution that works for you. But my examples above do at least work.

Summary

In this post I showed how I solved Azure DevOps project creation. The code above only show half the solution as it is very domain specific. However, I hope it helps you along the way. Creating the actual project is only one part of it. You need to create a paved road for the users. Therefore, make sure the users are able to access their projects and deploy resources. Automating the setup will ensure that every project is set up equally and supporting future requests from your developers will be much easier.

Share this:

  • Click to share on LinkedIn (Opens in new window) LinkedIn
  • Click to share on X (Opens in new window) X
  • Click to share on Reddit (Opens in new window) Reddit
microsoft social sign-in Azure

Azure Application registrations, Enterprise Apps, and managed identities

  • 04/03/202107/01/2025
  • by Martin Ehrnst

This post has been lurking in my drafts for almost two years now, and after a recent discussion with colleagues, it was about time I finish it.
Weekly I get questions about Azure AD application registrations and Enterprise Applications. And since you found this post, you are probably looking for a few answers yourself.

Over the years I have done a lot of work that requires playing around with authentication in Azure. Especially the case I had with the secure application model and Microsoft CSP gave me some good insight into this space. In general, I have limited knowledge of Oauth2, etc. And most of my work in this space has been related to integration with Azure Management APIs

The purpose of this post is to demystify everything around managed identities (MSI), Azure application registrations, and Enterprise Apps. Although Microsoft has this well documented, the context can be somewhat vague. Especially for new developers and IT Pros integrating with the Azure Control plane.

Azure Application registrations

Microsoft has a very robust identity platform in Azure AD. And by creating an application registration you can use this platform to authorize and authenticate various and multiple clients (Mobile, web apps, etc).

When creating an application registration you establish a trust relationship between the Microsofts identity platform and your custom application, meaning you trust Microsoft, but Microsoft does not trust your application in the same way.

You can create single-tenant, multi-tenant, and Microsoft (liveid) based app registrations or a combination of them. But the application definition is only tied to its home directory.

Azure ad application registration portal
  • Single-tenant configuration
    • Only principals in the “home” tenant can authenticate.
  • Multi-tenant application registrations
    • Allows users and applications in other Azure AD tenants to access your app.
  • Personal Microsoft accounts
    • Here you can allow Microsoft Live ID accounts to access.
Kahoot sign-in with microsoft google and apple

Enterprise applications – service principals

App registrations are not very functional on their own. Where App registrations is you custom application definition. Enterprise application is the application identity within your directory (Azure AD). The service principal (enterprise app) can only be assigned access to the directory it exists, and act as an instance of the application.

Relationship between app registrations and enterprise applications.

Enterprise applications (the service principal) have a reference to its Application registration. In most cases, you have one app registration and the service principal (enterprise application) in the same tenant.
When the application is accessible by multiple tenants, all tenants will have one enterprise application. However, the application registration itself will be in its “home” tenant

This can be confusing. But if you look in the enterprise application blade you can find applications from other app vendors being used by you or other users in your directory.

In short: Azure application registrations are the global representation of your custom application, and Enterprise Application is the local representation of the same application, bound to your tenant.

See this post on how to create Application registrations using PowerShell.

Conditional Access

Conditional Access is where you use signals to identify if a user can access your application or not. You then use these signals in an “if-this-then-that” format to decide whether the user can access your application.

Conceptual Conditional Access process flow
Image from Microsoft Docs

Conditional access is widely used for accessing cloud resources like the Azure Portal or Office 365. However, you can also use the service for your in-house developed applications as well.

Managed identities

Another player in the mix often causing confusion for developers and administrators is Managed Identities. When released, we used the name Managed Service Identities, in short MSI. But recently Microsoft renamed this service to Managed Identities.

Managed Identities is used to assign an identity (service principal) to an Azure resource. You can use this service principle to access other resources, leveraging the built-in authentication and authorization mechanisms you find in Azure.

Managed identities can access other Azure resources or custom applications.

Previously, when we did not have managed identities, we created an application registration for the resource. Using a secret or certificate to authenticate with Azure. This created a lot of overhead, as it required secret management, key rotation, etc. With managed identities, Azure takes care of this for us.

Managed Identities comes in two configurations. One fully managed and tied to a resource, or as an individual resource.

System-assigned managed identity

System-assigned is where you tie the identity to one specific resource. You configure this during resource deployment or assign an identity after it’s deployed.

The service principal created with system-assigned managed identity will follow the resource lifecycle. If you delete the resource, the identity will also be deleted.

User-assigned managed identity

User-assigned managed identities are individual resources. Multiple Azure resources can use one managed identity, or you can use multiple identities for one resource. Microsoft will still rotate keys and secrets. But with user-assigned managed identities you are in control of the service principal lifecycle and general governance.

Summary

There are a lot more to go through when talking about authentication. How to obtain Azure access tokens or how you add Azure login to your website is not covered here. However, I hope this post made the Azure application registrations, service principal, and managed identity space a bit more clear.

Share this:

  • Click to share on LinkedIn (Opens in new window) LinkedIn
  • Click to share on X (Opens in new window) X
  • Click to share on Reddit (Opens in new window) Reddit

Posts pagination

1 2 3 4 5 … 19

Popular blog posts

  • SCOM Alerts to Microsoft Teams and Mattermost
  • How to move Azure blobs up the path
  • Windows Admin Center with SquaredUp/SCOM
  • SCOM Task to restart Agent - am i complicating it?
  • Azure Application registrations, Enterprise Apps, and managed identities

Categories

Automation Azure Azure Active Directory Azure Bicep Azure DevOps Azure Functions Azure Lighthouse Azure Logic Apps Azure Monitor Azure Policy Community Conferences CSP Monitoring DevOps GitHub Guest blogs Infrastructure As Code Kubernetes Microsoft CSP MPAuthoring OMS Operations Manager Podcast Powershell Uncategorised Windows Admin Center Windows Server

Follow Martin Ehrnst

  • X
  • LinkedIn

RSS feed RSS - Posts

RSS feed RSS - Comments

Microsoft Azure MVP

Martin Ehrnst Microsoft Azure MVP
Adatum.no use cookies to ensure that we give you the best experience on our website. If you continue to use this site we will assume that you are happy with it. Cookie Policy
Theme by Colorlib Powered by WordPress