Skip to content
adatum
  • Home
  •  About adatum
  •  Learn Azure Bicep
  •  SCOM Web API
Automation

SCOM Alerts to Microsoft Teams and Mattermost

  • 06/01/201707/01/2025
  • by Martin Ehrnst

…or slack?

For a SCOM 2016 implementation I have worked around different methods to consume alerts. Keeping emails to an absolute minimum and add more smartness to alerts and incidents is one of the main goals.

On a daily basis we use custom dashboards created with SquaredUp and integrated this with our ticketing and CMDB systems, allowing us to create alert tickets directly from SCOM on the connected to the correct server/person/customer etc. (Sounds like a great blog post down the road)

On the concept side of things, it shouldnt matter what system you use to handle alerts as long as someone takes action on it. So in this blog post I will show how you can ‘interact’ or at least notify on alerts with two collaboration tools. Microsoft Teams and Mattermost.

This example uses SCOM as the alert source, but it could easially be another monitoring system, Solarwinds, OMS, Datadog etc.

The main technique involves Webhooks which i used when sending alerts to Azure Automation, and is somewhat the same thing we are doing here.

On a high level, this is what we are going through.

  • Creating Channels in MSFT Teams and Mattermost
  • enabling them to receive incoming webhooks
  • Create a new SCOM command channelAdd the PS script to send alerts

In teams, create a new channel by clicking the three bullets.( If you want to use an existing channel feel free).

After naming your channel, create a webhook for it by adding a new connector, and configure it.

Set a name and maybe an image, and remember to copy your URL.


In SCOM create a new command channel

You will ned the full path to powershell as the command file, which is:

C:\Windows\System32\WindowsPowershell\v1.0\Powershell.exe

And the startup folder

C:\Windows\System32\WindowsPowershell\v1.0\

The command line parameters are basicly a powershell script writtes as a ‘one-liner’ after the command parameter.

I will break it down for you here.

-executionpolicy Unrestricted -Command " &{Invoke-RestMethod -Method Post -Uri 'https://outlook.office365.com/webhook/************'

We are setting the execution policy and starting powershell with a command. The first “section” is a post to your webhook url.

Second, as the body i create a hash-table which holds our data and convert it to Json. For readability I have stripped down the code a little. We will insert data from SCOM here in the end.

-Body (ConvertTo-Json -InputObject @{'Title'='The title';'Text'='[View alert in SCOM Web console](https://scom)'}) -ErrorAction Stop}"

After you have created the command channel. Continue to add a new subscriber and a new subscription. When an alert matching your criteria is triggered you will se the following in your teams channel.

Success!

Mattermost: Using integrations from the menu. Create a new webhook assigned to the channel you want. Copy the webhook URL to use in your script, which for mattermost looks like this (should be somewhat equal to Slack). Not much changed from Teams.

 -Body (ConvertTo-Json -InputObject @{'text'='alertname [View alert in SCOM](https://yoururl)';'username'='SCOM Alerts'}) -ContentType application/json  -ErrorAction Stop}"

Please note that everything goes under ‘text’ and I have added a content type in our request as well an override for the poster username.

If all went well you should see a result like this:

Here are the two commands for each channel with SCOM data

Teams:

-executionpolicy Unrestricted -Command " &{Invoke-RestMethod -Method Post -Uri 'https://outlook.office365.com/*****' -Body (ConvertTo-Json -InputObject @{'Title'='$Data[Default='Not Present']/Context/DataItem/ManagedEntityPath$\$Data[Default='Not Present']/Context/DataItem/ManagedEntityDisplayName$ : $Data[Default='Not Present']/Context/DataItem/AlertName

Mattermost:

-executionpolicy Unrestricted -Command " &{Invoke-RestMethod -Method Post -Uri 'https://mattermost/hooks/*******' -Body (ConvertTo-Json -InputObject @{'text'='$Data[Default='Not Present']/Context/DataItem/AlertName$ : $Data[Default='Not Present']/Context/DataItem/ManagedEntityPath$\$Data[Default='Not Present']/Context/DataItem/ManagedEntityDisplayName$ [View alert in SCOM](https://URLid=$Data/Context/DataItem/AlertId$)';'username'='SCOM Alerts'}) -ContentType application/json  -ErrorAction Stop}"

Notes:

As you see I have put the scripts which handles the logic in a powershell onliner, inside a SCOM channel.

The next thin I want to do is to add more logic to the messages posted in Teams/Slack/Mattermost like taking actions etc.

To do this i will move the code out of scom and probably trigger an external script that does the logic. It could run serverless in azure functions, AWS Lambda, in azure automation, SMA or what ever you chose. I am looking to accomplish something like this and will of course let you know when its done.

from Slack documentation

References

https://msdn.microsoft.com/en-us/microsoft-teams/connectors

https://docs.mattermost.com/developer/webhooks-incoming.html

;'Text'='[View alert in SCOM Web console](https://URL/$Data/Context/DataItem/AlertId$)'}) -ErrorAction Stop}"

Mattermost:


Notes:

As you see I have put the scripts which handles the logic in a powershell onliner, inside a SCOM channel.

The next thin I want to do is to add more logic to the messages posted in Teams/Slack/Mattermost like taking actions etc.

To do this i will move the code out of scom and probably trigger an external script that does the logic. It could run serverless in azure functions, AWS Lambda, in azure automation, SMA or what ever you chose. I am looking to accomplish something like this and will of course let you know when its done.

from Slack documentation

References

https://msdn.microsoft.com/en-us/microsoft-teams/connectors

https://docs.mattermost.com/developer/webhooks-incoming.html

Share this:

  • Click to share on LinkedIn (Opens in new window) LinkedIn
  • Click to share on X (Opens in new window) X
  • Click to share on Reddit (Opens in new window) Reddit
MPAuthoring

SCOM Task to restart Agent – am i complicating…

  • 16/11/201607/01/2025
  • by Martin Ehrnst

As part of planning to migrate a large (3000 + VM) SCOM 2012 R2 environment to 2016 we will need to do a bit of agent configuration. I have created two tasks in Our SCOM console to help us add or delete management Groups from the monitored computers (when moving all agents we probably will use some other orchestration). The problem is that you will have to restart the agents HealthService to save new configuration. Since we execute the task/script through the Health service the task will fail when we attempt to restart. You may experience Your task to work, as in you will have the managment Group added, but you will not see any output.
Over the years People have published a lot of scripts that restarts the agents but unfortunately I have not managed to get them to work properly.

Therfore, i am complicating Things…

I created a script which creates a scheduled task set to run in one minute before it expires and deletes. The Whole thing Works perfectly, but there has to be another way?

<#
NAME: Create-SCOMAgentRestartSchedTask.ps1

.DESCRIPTION
    Creates a scheduled task on the computer which will restart scom health service.
    Script is used as agent task within SCOM as a 'hack' to restart agent through the console.
    
.NOTES
    Martin Ehrnst /Intility AS
    www.adatum.no

    Intial release November 16
    Version 1.0


#>

#Do some logging to the Operations Manager Event Log
$api = new-object -comObject MOM.ScriptAPI
$api.LogScriptEvent("Create-SCOMAgentRestartSchedTask.ps1", 1001, 4, "Creating a scheduled task to restart SCOM health service. Task will expire and delete after it's finished.")

$Service = "HealthService"
$Action = New-ScheduledTaskAction -Execute "C:\Windows\System32\WindowsPowerShell\v1.0\powershell.exe" -Argument "Get-Service $Service | restart-service -force"
$run = (Get-Date).AddMinutes(1) # Two minutes from now
$User = 'SYSTEM'
$trigger = New-ScheduledTaskTrigger -Once -At ($run)
$settings = New-ScheduledTaskSettingsSet -DeleteExpiredTaskAfter 00:00:01
Register-ScheduledTask -TaskName "Restart SCOM HealthService" -User $user -InputObject (
  (
    New-ScheduledTask -Action $Action -Trigger $trigger -Settings $settings
) | %{ $_.Triggers[0].EndBoundary = $run.AddMinutes(5).ToString('s') ; $_ })
write-host "created a task to restart $service in one minute"

I know that Microsoft have a recovery action to restart the agent when it is using too much memory and similar, but I haven’t broken Down their code.

taskinfosystemeventlog

Share this:

  • Click to share on LinkedIn (Opens in new window) LinkedIn
  • Click to share on X (Opens in new window) X
  • Click to share on Reddit (Opens in new window) Reddit
Automation

Weather Data in OMS Log Analytics

  • 24/10/201607/01/2025
  • by Martin Ehrnst

If you’re one of the few who has seen my last blog posts about my SCOM weather management pack, you have probably figured that I am a bit too much in to the weather. Along side the weather management pack I looked in to getting the same type of data in to Microsoft Operations Management Suite (OMS) and the Log analytics part of it. I knew that OMS has a REST api that supports sending data without having to use any agents and i figured that’s perfect for my little weather study.

For around three weeks ago I took bits an pieces from my weather MP and made a powershell script that could output Json which is used in MSOMS API. On TechNet Brian Wren has written a guide on how to get started using the Data Collector API – I grabbet the already created functions and adapted those in to my script, placed it in Azure Automation and forgot the whole thing until last friday where i created a view for some of the data and posted it on Twitter

2016-10-24-21_00_58-the-ehrnst-ehrnst-_-twitter


Community chief, Cameron Fuller reached out an told me he worked on the same thing. I contacted him by email and we exchanged our scripts and he shared some tips as well.


Enough with the history. The script we created have the ability to get weather data from yr.no (norwegian site) and openweathermap. Yr.no was what i used for SCOM, and OpenWeather was something Cameron was looking in to. There API’s are different, but OK to work with.

Setting the script together

The script has four functions two of them are from technet, and is required to get an autorization key, and the other one to send the data. These are well documented so i will go through the ones who get the data and how it ties together.


Get-YrWeatherData

YR.no has an XML based API. We get data from observations and the forcasted temperature. To use it you get the full URL from yr.no example: http://www.yr.no/place/Norge/Oslo/Oslo/Oslo/forecast.xml


#region YRno Config
$URLs = 'http://www.yr.no/place/Norge/Rogaland/Stavanger/Stavanger/forecast.xml', 
'http://www.yr.no/place/Norge/Hordaland/Bergen/Bergen/forecast.xml', 
'http://www.yr.no/place/norge/oslo/oslo/oslo/forecast.xml',
'http://www.yr.no/place/USA/New_York/New_York/forecast.xml',
'http://www.yr.no/place/Storbritannia/England/London/forecast.xml'
$YRLog = "YRno" #setting the log type for YRno
#endregion


param(
[Parameter(Mandatory = $false)]
[string[]]$locationURL
)
$LogType = "YRno" #setting the log type for YRno

if (!$locationURL){
$locationURL = 'http://yr.no/place/Norway/Oslo/Oslo/Oslo/forecast.xml'} #default URL to Oslo, Norway
#Create a table to accept multiple locations
$weatherTable = @()
foreach ($url in $locationurl){   
[xml]$yr = Invoke-WebRequest -Uri $URL -UseBasicParsing
[string]$locationName = $yr.weatherdata.location.name
#Getting the forcasted temperature
[int]$ForecastTemp = $yr.SelectNodes("//forecast").tabular.time.temperature.value | Select-Object -First 1
[int]$Forecastprecipitation = $yr.SelectNodes("//forecast").tabular.time.precipitation.value | Select-Object -First 1
[int]$observedtemp = $yr.SelectNodes("//observations").weatherstation.temperature.value | Select-Object -First 1
[string]$observedVindName = $yr.SelectNodes("//observations").weatherstation.windSpeed.name | Select-Object -First 1
[string]$observedVindDirectioName = $yr.SelectNodes("//observations").weatherstation.windDirection.name | Select-Object -First 1
#Output

$weatherData = @{
'LocationName' = $locationName
'ForecastedTemp' = $ForecastTemp
'Precipitation' = $Forecastprecipitation
'ObservedTemp' = $observedtemp
'WindDirection' = $observedVindDirectioName
'Wind' = $observedVindName
}

#add location weather data to our table
$weatherTable +=$weatherData

}
#Convert data to Json accepted by OMS
$weathertable  | ConvertTo-Json
}


Get-OpenWeatherMapData

Probably the one that is going to be used by the broad audience.

To use this you must sign up to OpenWeatherMap.org and obtain an API key. It is free for unless you use it for some commercial stuff or use huge amount of data.

The function uses a location ID inside the variable $Citys. I find it easiest to just grab it from the end of the location url after you have found your city. Paris FR, http://openweathermap.com/city/2988507
Chose between Imperial, Metric or Kelvin to adapt to your needs – who uses kelvin?

The current version has a bug where it only supports one location ID. We are looking in to it and will update when it’s fixed.


#region OpenWeathermap Config
$Citys = '3137115'
$Unit = 'Metric' #chose between Metric, Imperial or Kelvin
$OpenLog = "OpenWeather" #setting log type for OpenWeatherMap
#endregion


Param ($OpenWeatherMapKey, $Citys)
$LogType = "OpenWeather" #setting log type for OpenWeatherMap
$weatherTable = @()
Foreach ($city in $Citys){

$GetWeather = Invoke-RestMethod -uri "api.openweathermap.org/data/2.5/weather?id=$City&APPID=$OpenWeatherMapKey&units=$Units"
[String]$City = $GetWeather.name
[String]$WeatherDescription = $GetWeather.weather.description
[int]$Temp = $GetWeather.main.temp
[int]$WindSpeed = $GetWeather.wind.speed
[int]$BarometricPressure = $GetWeather.main.pressure
[int]$Humidity = $GetWeather.main.humidity

#Output

$weatherData = @{
'City' = $city
'Temp' = $Temp
'Humidity' = $Humidity
'WindSpeed' = $WindSpeed
'BarometricPressure' = $BarometricPressure 
'Description' = $WeatherDescription
}

$weatherTable += $weatherData
#Convert data to Json accepted by OMS
$weathertable  | ConvertTo-Json
}
#End Function
}

OpenWeather also have a good API documentation


Setting up Azure Automation part

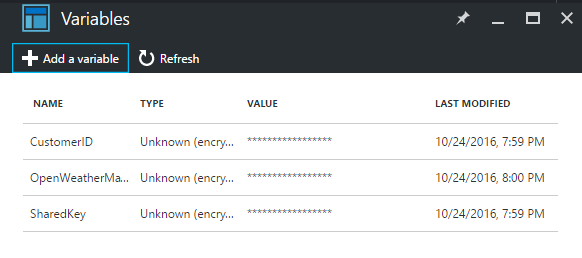
We designed the whole thing to run in Azure automation and for it to be easy for others to use we utilize the ability to store encrypted variables to use inside your scripts.

Assuming you already have an azure automation account you go to: Automation accounts > ‘account’ >Assets and create the following variables

  • CustomerID
    • This is the OMS workspace ID
  • SharedKey
    • Primary key from your OMS workspace
  • OpenWeatherMapKey
    • If using openweathermap. This is you api key

omsvariablerunbook

Finished, it should look like this

variables-microsoft-azure


The next thing will be to create a azure automation runbook. I will suggest you use the ISE addon to create runbooks/workflows, but for this its a matter of copy and paste so web gui is fine. Below you will find the initial script release, but latest version is always available on GitHub

<#

    .DESCRIPTION
    OMS weather Solution - track weather forecast and observations within MSOMS

    Usage and Configuration:
    There are one config region per function. This script can get data from OpenweatherMap or Norwegian YR.no (not only norwegian locations)
    Edit each config area to fit your own environment.
    Script is intended to run in azure atuomation. You will have to create runbook assets to use this script
    If you want to run in another automation tool or on your own computer, please change the general variables

    In the end of the script. Comment out the function you do not want to use.

    .NOTES
    Version 1.5

    Martin Ehrnst /adatum.no /@ehrnst
    Cameron Fuller, Catapult systems /@cfullerMVP

    .CHANGELOG
    30.01.2017 v.1.5:
    Fixed multiple location issue for Open Weather Map.
    Thanks to 'jowildes' (blog comment) pointed out that there was some incorrect bracket placements causing the trouble
    Minor code changes

    October 2016 v1.1 
    (Initial release)

#>

#region General variables
$customerId = Get-AutomationVariable -Name 'CustomerID'
$SharedKey = Get-AutomationVariable -Name 'SharedKey'
$OpenWeatherMapKey = Get-AutomationVariable -Name 'OpenWeatherMapKey'
$time = [DATETIME]::Now
#endregion

#region OpenWeathermap Config
$Citys = '3137115', '2643743', '1880252' #Get your City ID from Open Weather Map URL
$Unit = 'Metric' #chose between Metric, Imperial or Kelvin
$OpenLog = "OpenWeather" #setting log type for OpenWeatherMap
#endregion

#region YRno Config
$URLs = 'http://www.yr.no/place/Norge/Rogaland/Stavanger/Stavanger/forecast.xml', 
'http://www.yr.no/place/Norge/Hordaland/Bergen/Bergen/forecast.xml', 
'http://www.yr.no/place/norge/oslo/oslo/oslo/forecast.xml',
'http://www.yr.no/place/USA/New_York/New_York/forecast.xml',
'http://www.yr.no/place/Storbritannia/England/London/forecast.xml'
$YRLog = "YRno" #setting the log type for YRno
#endregion

function Get-YrWeatherData{
<#
Get-YrWeatherData
uses yr.no xml api to get loaction forcasted and observed temperature.
Result is converted to Json and originally created for OMS data collector API

Version 1 September 2016
Martin Ehrnst /Adatum.no

NOTE: YR.no does not have observations for all locations.
#>


param(
    [Parameter(Mandatory = $false)]
    [string[]]$locationURL
)

if (!$locationURL){
    $locationURL = 'http://yr.no/place/Norway/Oslo/Oslo/Oslo/forecast.xml'} #default URL to Oslo, Norway
#Create a table to accept multiple locations
    $weatherTable = @()
foreach ($url in $locationurl){   
    [xml]$yr = Invoke-WebRequest -Uri $URL -UseBasicParsing
    [string]$locationName = $yr.weatherdata.location.name
#Getting the forcasted temperature
    [int]$ForecastTemp = $yr.SelectNodes("//forecast").tabular.time.temperature.value | Select-Object -First 1
    [int]$Forecastprecipitation = $yr.SelectNodes("//forecast").tabular.time.precipitation.value | Select-Object -First 1
    [int]$observedtemp = $yr.SelectNodes("//observations").weatherstation.temperature.value | Select-Object -First 1
    [string]$observedVindName = $yr.SelectNodes("//observations").weatherstation.windSpeed.name | Select-Object -First 1
    [string]$observedVindDirectioName = $yr.SelectNodes("//observations").weatherstation.windDirection.name | Select-Object -First 1

#Output

$weatherData = @{
    'LocationName' = $locationName
    'ForecastedTemp' = $ForecastTemp
    'Precipitation' = $Forecastprecipitation
    'ObservedTemp' = $observedtemp
    'WindDirection' = $observedVindDirectioName
    'Wind' = $observedVindName
    }

#add location weather data to our table
$weatherTable +=$weatherData

}
#Convert data to Json accepted by OMS
$weathertable  | ConvertTo-Json
}

Function Get-OpenWeatherMapData {

<#
Get-OpenWeatherMapData

Uses openweathermap.com api to get weather data and inserts in to OMS log analytics
Version 1.0 January 2017
Created by Cameron Fuller & Martin Ehrnst

#>

Param ($OpenWeatherMapKey, $Citys)
$weatherTable = @()
Foreach ($city in $Citys){

    $GetWeather = Invoke-RestMethod -uri "api.openweathermap.org/data/2.5/weather?id=$City&APPID=$OpenWeatherMapKey&units=$Unit"

    [String]$City = $GetWeather.name
    [String]$WeatherDescription = $GetWeather.weather.description
    [int]$Temp = $GetWeather.main.temp
    [int]$WindSpeed = $GetWeather.wind.speed
    [int]$BarometricPressure = $GetWeather.main.pressure
    [int]$Humidity = $GetWeather.main.humidity

    #Output
    $weatherData = @{
    'City' = $city
    'Temp' = $Temp
    'Humidity' = $Humidity
    'WindSpeed' = $WindSpeed
    'BarometricPressure' = $BarometricPressure 
    'Description' = $WeatherDescription
    }

    #add location weather data to our table
    $weatherTable +=$weatherData
    }
    #Convert data to Json accepted by OMS
    $weathertable  | ConvertTo-Json
}
#End Function
# Function to create the authorization signature - TECHNET example
Function New-Signature ($customerId, $sharedKey, $date, $contentLength, $method, $contentType, $resource)
{
  $xHeaders = 'x-ms-date:' + $date
  $stringToHash = $method + "`n" + $contentLength + "`n" + $contentType + "`n" + $xHeaders + "`n" + $resource

  $bytesToHash = [Text.Encoding]::UTF8.GetBytes($stringToHash)
  $keyBytes = [Convert]::FromBase64String($sharedKey)

  $sha256 = New-Object -TypeName System.Security.Cryptography.HMACSHA256
  $sha256.Key = $keyBytes
  $calculatedHash = $sha256.ComputeHash($bytesToHash)
  $encodedHash = [Convert]::ToBase64String($calculatedHash)
  $authorization = 'SharedKey {0}:{1}' -f $customerId, $encodedHash
  return $authorization
}

#Send data to OMS - a technet example
Function Send-OMSData($customerId, $sharedKey, $body, $logType)
{
  $method = 'POST'
  $contentType = 'application/json'
  $resource = '/api/logs'
  $rfc1123date = [DateTime]::UtcNow.ToString('r')
  $contentLength = $body.Length
  $signature = New-Signature `
  -customerId $customerId `
  -sharedKey $sharedKey `
  -date $rfc1123date `
  -contentLength $contentLength `
  -fileName $fileName `
  -method $method `
  -contentType $contentType `
  -resource $resource
  $uri = 'https://' + $customerId + '.ods.opinsights.azure.com' + $resource + '?api-version=2016-04-01'

  $headers = @{
    'Authorization'      = $signature
    'Log-Type'           = $logType
    'x-ms-date'          = $rfc1123date
    'time-generated-field' = $time
  }

  $response = Invoke-WebRequest -Uri $uri -Method $method -ContentType $contentType -Headers $headers -Body $body -UseBasicParsing
  return $response.StatusCode
}


$YRdata = Get-YrWeatherData -locationURL $URLs
Send-OMSData -customerId $customerId -sharedKey $sharedKey -body ([System.Text.Encoding]::UTF8.GetBytes($YRdata)) -logType $YRlog
$YRdata


$Opendata = Get-OpenWeatherMapData -OpenWeatherMapKey $OpenWeatherMapKey -Citys $Citys
Send-OMSData -customerId $customerId -sharedKey $sharedKey -body ([System.Text.Encoding]::UTF8.GetBytes($Opendata)) -logType $OpenLog
$Opendata

After the script is in azure, please run a test to see if everything is alright


testsuccess-microsoft-azure

When everything is functioning correctly, add a schedule to the runbook and wait until tomorrow. you should have some cool data points to work with

new-schedule-microsoft-azure


When searching for your data. Remember dat OMS adds a default suffix “_CL” to the end of all custom data types. Fields are also getting an “_s” for string etc. You can see all custom fields from the configuration area in OMS

Time to start to play with your data

Typing Type=OpenWeather_CL | measure avg(ObservedTemp_d) by City_s interval 1hour in to your search will give a time chart similar to this.

2016-10-24-22_22_21-log-search-microsoft-operations-management-suite


Now, weather data is just an example, but whit the ability to send data through OMS data collector API and create our own solutions/dashboards inside OMS i know we will see some cool stuff in a short time.

Share this:

  • Click to share on LinkedIn (Opens in new window) LinkedIn
  • Click to share on X (Opens in new window) X
  • Click to share on Reddit (Opens in new window) Reddit

Posts pagination

1 … 5 6 7 8 9 10

Popular blog posts

  • SCOM Alerts to Microsoft Teams and Mattermost
  • How to move Azure blobs up the path
  • Creating Azure AD Application using Powershell
  • SCOM and OMS: The agents
  • Azure Application registrations, Enterprise Apps, and managed identities

Categories

Automation Azure Azure Active Directory Azure Bicep Azure DevOps Azure Functions Azure Lighthouse Azure Logic Apps Azure Monitor Azure Policy Community Conferences CSP Monitoring DevOps GitHub Guest blogs Infrastructure As Code Kubernetes Microsoft CSP MPAuthoring OMS Operations Manager Podcast Powershell Uncategorised Windows Admin Center Windows Server

Follow Martin Ehrnst

  • X
  • LinkedIn

RSS feed RSS - Posts

RSS feed RSS - Comments

Microsoft Azure MVP

Martin Ehrnst Microsoft Azure MVP
Adatum.no use cookies to ensure that we give you the best experience on our website. If you continue to use this site we will assume that you are happy with it. Cookie Policy
Theme by Colorlib Powered by WordPress