Skip to content
adatum
  • Home
  •  About adatum
  •  Learn Azure Bicep
  •  SCOM Web API
Automation

Using Azure pipelines to deploy ARM templates

  • 27/02/201907/01/2025
  • by Martin Ehrnst

There are many reasons that you would use an Azure Resource Manager (ARM) template to deploy your Azure resources. And there’s equally many ways to deploy this kind of template.

For simple one time deployments of Azure resources I tend to use PowerShell or AZ CLI, but lately I have ben busy trying to create a web api based on Azure Functions using C# and .NET core. For those who know me, that’s not straight foreward.
To make things even more diffucult, I wanted to use Azure DevOps and Pipelines to build and push my code. In order to do that, I had to have some infrastructure in place, so why wouldn’t I use Azure Pipelines to deploy the ARM template as well?

Create ARM template

In order to deploy Azure Resource Manager templates, you will need to create one. ARM templates are based on Json and follows a schema. This schema or rule set if you like, defines how you must structure your template.

There are two forms of deployment options. At a resource group level (most common) and subscription level deployment. Both uses the same kind of Json language but have two different schemas. You’ll find the current resource group deployment schema here (no need to read :))

If you are unfamiliar with Json and ARM templates I recommend you to read Microsofts official documentation and getting started guide which will show how you can find the template from an existing deployment or create a new.

For reference, this is a simple template to deploy a web app, that I copied from Microsofts GitHub repo with a bunch of templates to get you started.

Adding ARM template along with your code

As I already mentioned deploy ARM template in a pipeline makes sense in many ways, especially if you have developed an application. This way you can control the infrastructure along side the code.

My Azure Function uses Cosmos DB and Key Vault as parts of it’s infrastructure. It is all developed in Visual Studio Code, and the whole thing is cutting edge for an old operations guy like me.

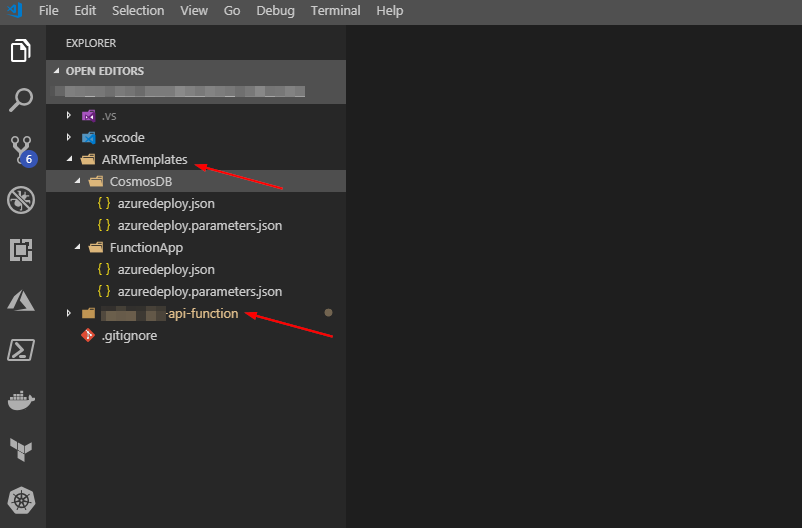
In the picture below you’ll see that I have structured my project in to two subfolders. One is holding the ARM templates, and the other one is for the acutal functions code. I did this so i would be able to chose artifacts from the build process in Azure DevOps pipelines. There might be a better way, but when i had everything in the same folder the templates was packed with the code and not available in deployment pipeline.

vscode function project with arm template folder

Set up the build pipeline

Not long ago I learned that there are two types of pipelines. Build pipelines and release pipelines. Build is used to pack up or actually build the application (same as pressing f5 in Visual Studio). Where release are used for pushing the application on to your infrastructure (and deploy the infra).

For reference. In Azure DevOps, my folder structure looks exactly the same

Next move over to pipelines and create a new release pipeline. From here chose your repository (I use Azure repos).

After chosing your repo, ou can chose to start from a template. My project is a .NET core application and I had no idea what was needed to build that, so a template worked nicely. Here you can chose what’s best for you’re project. The important pieces from an ARM template perspective comes in the next steps

Start out by filling in the obvious. A name and a server to do the build. In my case i run with Azure hosted 2017. In an on premises environment I would use private servers.

Add your templates as build artifacts

What you will need to do next is to take those Json files in your arm template catalog, and make them available as part of the build. You will have to add in a “Copy files” step and fill in a few properties. Pay attention to where I chose the source folder and the destination folder which have a variable reference, $(build.artifactstagingdirectory)/arm

Now. Hit save and queue. This will save your new (or edited pipeline) and start a build of your project.

By now you should also have a build running, and if you’re like me, exploring new stuff, you get used to this

Axure pipelines failed build publish

In this particular error. The publish task for .NET core is missing www root folder. By trial and error I found that I had to make a few changes to my build pipeline. This is not a prerequisite for running ARM templates with Azure pipelines, but i figured I should add in everything I had to do for this project, both for my reference and for yours if needed.

I removed “publish web projects” as i don’t have an ordinary web project, but an Azure function based API.

When you remove this tick, the task will refere to your project file (.CSPROJ).


Here i should give a shout out to my trusty colleague Emil Kjelsrud for helping out, once again.

Hit save and queue once again. Voila!

Configure the release pipeline with ARM templates

When your build is successful, we’re close to launch our application on to Azure. We do that by configuring a release pipeline. It is possible to combine the two, but I like them separated.

Under Pipelines > Releases hit new. A new wizard will pop up. Either chose one that fit your purpose, or start from scratch. In my case I chose to start with app service deployment. One of the first things you notice is “some settings need attention.”

Required settings in this context are the connection to your Azure environment and subscription. You will need to configure this in order to continue. There are several methods available for connecting your pipelines to Azure. I have my pipeline deploying resources in a tenant and subscription that my user does not have access to. That configuration requires a SPN/App registration in Azure AD with the correct permissions.

After configuring your connection. Modify your pipeline by adding in your required Azure Resource Group Deployment tasks. Here comes a few important bits. Prior to setting up my pipeline, I have a resource group created already. If you want to have the resource group created during deployment. You can use the Azure CLI or Azure powershell tasks (or a template) to do so.

Continue to fill in the required parameters. Remember that I separated my application code and the templates in to separate folders? This is why. I can now chose from the same artifact what i want to deploy, as the build pipeline have them available in their respective folders. Chose the template and your parameters file.

In this Azure DevOps environment we have an extension available that parses all outputs from your ARM templates. This way I can use variables from the previous step in my app service deployment. If you dont have this extension available, you can achieve the same result using PowerShell

Create the release

You’re pipeline is now complete. Save and create a release, the pipeline should now pick up the latest build and deploy your code to Azure. You can follow the whole process in Azure, under resource group > deployment and in Azure DevOps

After a few minutes (or seconds) depending on your configuration, you should have both your infrastructure and the actual application available.

Final thoughts

While I understand many of the concepts around infrastructure as code, continious integration and so on, I don’t always use the correct terms, so thank you for reading.

I hope you also have a greater understanding around the concepts, and also how you can utilize the possibilities available. My thoughts working with projects like this is always bound to the operational side. I know I’m going to use more ARM templates in Azure Pipelines, but probably not along side the actual code, as that’s not my day-to-day work. Again, I see my self working more and more with these Dev tools, and thats why I like to say that this is how we do modern Ops.

I leared a few more tips and tricks during this small project, so expect a few more posts soon.

Share this:

  • Click to share on LinkedIn (Opens in new window) LinkedIn
  • Click to share on X (Opens in new window) X
  • Click to share on Reddit (Opens in new window) Reddit
Azure

Microsoft Secure application model

  • 20/01/201907/01/2025
  • by Martin Ehrnst

Secure application model was released by Microsoft late last year (2018). At that time, I noticed it and didn’t quite understad how it impacted my work. I therfore moved on.

A few weeks ago i discovered what this change actually means.
If you are a Microsoft cloud service provider or a control panel vendor, you will have to change to this new model of authentication soon. Depending on how you deliver apps or how you manage your customer tenants, there’s quite some work to do.

Microsoft is forcing all user accounts with access to CSP with MFA. That is great, but if you (and likely you are) using app + user credentials to access partner center you cannot do this programmatically, as the current method uses password grant. I have written about how that method works here.

The secure application model depends on refresh tokens and access tokens. As a service provider your customers will have to consent to an application getting access to their tenant. When the admin user consent, you will get a code response. This code is used to create a refresh token, which later can be used to access Azure or other resources.
I do not have the mandate to learn you how refresh and access tokens work, but i found the articles on Oauth.com pretty good.

The below picture shows a broad overview of the flow and ‘infrastructure’ required. I suggest you download the document as well.

Token flow in the secure application model

Secure application model infrastructure

i have built these examples with PowerShell to authenticate to a customer tenant using the new model. The model used here assumes you function as a managed service provider. Maintaining your customers Azure tenants and subscriptions. That way you can consent on behalf of your customers. If you provide Azure market place applications, the process is a bit different, but infrastructure wise, were using the same tools.

In my implementation of secure application model I have used the following tools.

  • Azure KeyVault
  • Multi tenant Azure AD Application, with access to the APIs you require.
  • A user able to consent (in my case member of Admin Agents in CSP)
  • Single tenant AAD app to authenticate against KeyVault

Multi tenant Azure AD application

If you find this blog post interesting, I assume you already have a multi tenant AAD app used in your integration or software delivery.
If not, you can check out my blog post on how to create Azure AD apps using PowerShell

In my case I have one application used to monitor customers workloads in Azure. This application have access to Azure Management APIs

Single tenant web app

This is the additional application needed. This application will represent your system. In my case a monitoring tool. I use this application registration to access key vault where I have stored my refresh token. The refresh token is then used to get an access token from a customer tenant.

Azure Key Vault

We need a secure place to store the refresh token and possibly other stuff down the road. I chose to run with Key Vault. There are multiple blog posts and documentation on how to provision and give permissions in key vault, but remember to give your single tenant application read and write access to secrets.

Using PowerShell and Rest APIs

As I have multiple times before, I chose to run with REST rather than PowerShell modules. Feel free to use modules or SDKs, it just doesen’t work that well in my environment.

Getting consent

I’m sure theres much slicker ways to do this, but I only needed one consent to make our integration work. If you have multiple refresh tokenst etc. I would build some kind of callback service that could handle the consent flow.
Alter the following code to your needs, paste it in your web browser and sgn in with apropriate credentials. In return, you will have recieve a code. Copy and use this in next step.

Azure AD refresh token

Now that you have consent it is time to get a refresh token. This is what you later use to get access tokens from your customer tenants. By default and if used. The refresh token is valid for 90 days. You will have store this in Key Vault or a similar service.
Add your information to the script below to get your refresh token.

Write and retrieve from Key Vault API

Since you don’t want to get a new consent every time, you will need to save your refresh token to a secure place. I chose to run with Key Vault, but feel free to chose what ever software you want. Below are two snippets that will allow to write and retrieve secrets from Azure KeyVault.
You will have to get your key vault URL and the single tenant application id and secret.
That way your application accessing customers tenants, in my case a monitoring system, have it’s own credentials, separated from the credentials aquiring the refresh and access tokens.

Retrieving data from customer tenant

It’s time to connect to your customers tenants. Before doing that, lets summarize. By now you should have the following in place

  • One multi tenant application with Api access and proper consent.
  • A key vault with the a refresh token
  • A single tenant (your integration) application with access to key vault
  • AppID and access keys for bot application registrations.

Below I have included three examples on how to retrieve data from your customers. The first will get all customers from partner center, second will use the same refresh token to access Microsoft Graph, and the third will access Azure management API’s (Azure Resource Manager). In order for this to work, your multi tenant app must have access to these APIs

Share this:

  • Click to share on LinkedIn (Opens in new window) LinkedIn
  • Click to share on X (Opens in new window) X
  • Click to share on Reddit (Opens in new window) Reddit
Azure logo as christmas tree Uncategorised

2018 summary

  • 20/12/201807/01/2025
  • by Martin Ehrnst

2018 – what a year. Besides being the busiest year in my career for a long time, I have had alot of fun doing it!

During 2018 I have used most of my time trying to tame the (in lack of better words) ‘beast’ that Microsoft cloud is. I have spent noumerous hours deep diving in to Azure and Microsoft partner portals REST APIs. As well as developing new services for my employer.

Community

Besides maintaining this blog as my personal libary of technical documentation. Another goal is to provide good content back to the community I’m a part of.

In 2016 I decided to try more ways of contributing to the communtity. One of the things was to contribute to open source, and another was to present at various events.
2018 turned out to be the year for presentations.

  • Nordic Infrastructure conference
  • Azure User Group Norway
  • SquaredUp for hosting expert panel at Microsoft Ignite
  • Approved Consulting for hosting SCOM Day
  • SquaredUp for monitoring panel at Experts Live Europe
  • Microsoft Tech Summit Oslo

I would like to thank each and every one that came to my presentations, and to the organisers for your trust and opportunity.

Blog statistics

For those interested. The last year I have written 17 posts – thats not enough, hopefully I can produce some more written content next year.

In total 14.500 users have visited adatum.no. This results of 23.000 page views. Thats an increase of 55% in unique users since last year. Great!
The most popular post is actually about SCOM REST API Interfaces with a total of 1200 views. Second best performing post is Creating Azure AD Application registration using Powershell with just over 1100 views.

Twitter is by far the social with the most referrers, but most traffic is generated by organic search.

2019

The prospect of 2019 looks busy! I’m confident that community will be a priorty, but I might need to cut back on presentations.
2019 is the year where Microsoft brings Azure to Norway with two regions. I am really looking forward to working with customers making the correct choises on their journey to public cloud. This is going to be a lot of work and great fun, but we should still be pragmatic to the choices we make.

Thanks for following. Merry christmas!

Share this:

  • Click to share on LinkedIn (Opens in new window) LinkedIn
  • Click to share on X (Opens in new window) X
  • Click to share on Reddit (Opens in new window) Reddit

Posts pagination

1 … 9 10 11 12 13 … 19

Popular blog posts

  • SCOM Alerts to Microsoft Teams and Mattermost
  • How to move Azure blobs up the path
  • Creating Azure AD Application using Powershell
  • SCOM and OMS: The agents
  • Azure Application registrations, Enterprise Apps, and managed identities

Categories

Automation Azure Azure Active Directory Azure Bicep Azure DevOps Azure Functions Azure Lighthouse Azure Logic Apps Azure Monitor Azure Policy Community Conferences CSP Monitoring DevOps GitHub Guest blogs Infrastructure As Code Kubernetes Microsoft CSP MPAuthoring OMS Operations Manager Podcast Powershell Uncategorised Windows Admin Center Windows Server

Follow Martin Ehrnst

  • X
  • LinkedIn

RSS feed RSS - Posts

RSS feed RSS - Comments

Microsoft Azure MVP

Martin Ehrnst Microsoft Azure MVP
Adatum.no use cookies to ensure that we give you the best experience on our website. If you continue to use this site we will assume that you are happy with it. Cookie Policy
Theme by Colorlib Powered by WordPress