Skip to content
adatum
  • Home
  •  About adatum
  •  Learn Azure Bicep
  •  SCOM Web API
Azure Functions Logo Azure

Serverless application with PowerShell: Azure Functions

  • 03/08/201807/01/2025
  • by Martin Ehrnst

In part two we will integrate Azure Functions using Powershell triggered by Event Grid to complete the circle in our application infrastructure. If you havent read the previous parts in this blog series, i recommend you start with the introducution.


Azure Functions, what?

Azure’s serverless flagship probably don’t need any introduction at this stage, but in short. Azure Functions allows you to run code or scripts on demand triggered via various sources. Timer triggers, event, webhooks, http post, gets etc. The most common way to run your stuff is by consumption where your code run on spare compute in azure at a very low-cost. If you demand more power, you can also opt in for the app service plan.

Read more about functions and how to get started here.

FYI; the same type of service from AWS is called Lambda and Google offers similar with Cloud Functions


Powershell support

Powershell support in Azure Functions is still in preview, but I have used it many times, without issues. It is slower that all the other languages supported, but that doesent matter in this case. But be aware that azure functions Powershell run in v4. If you want to run C# or Java feel free to do so.


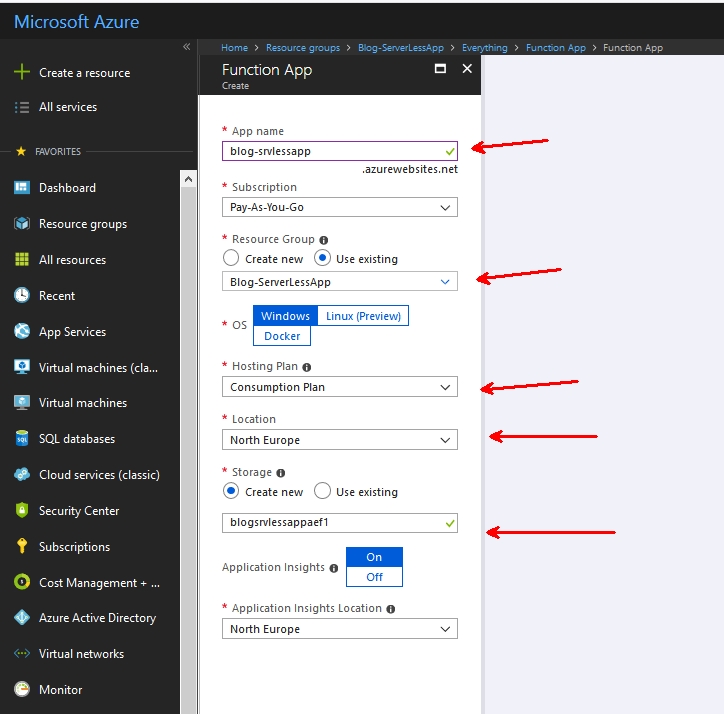
Let’s start by adding a new function app. Things to notice is that the name of your function app, is also the DNS name. App insights is on by default, and I have no idea why you would want to chose OS type. This wasn’t here before…

create a new azure function app from market place


without wasting too much of your time reading a lot of fill text, lets just create a new function. Remember to enable ‘experimental language support’ this will magically allow Powershell support (among others). Chose the HTTP trigger Powershell.

new powershell function

I am naming my first function “incoming-pizza-order” which we will add the code to and connect to Event Grid.

After creation you will have a function that supports GET and POST request with your name as the input. A “hello world” type of example. Let’s see if we can trigger this from Event Grid. As we did in the previous post. Create a new Event Grid subscription.

Failure, right? Let’s take a look.


Validating event grid subscriptions

Azure event grid accepts all incoming events and will pass them on to any subscribers. To add a layer of security you will have to validate the subscription upon creation. So all subscribers, weather it’s your own incoming webhook solution on premises or in a another cloud, will have to sort of handshake before it creates the subscription. As you see, the error message in Azure isn’t very good, and I searched quite a long time before I reached out to Ling Toh via Twitter. Luckily she pointed me in the right direction.

Upon creation event grid sends a validation request to the subscriber, which looks something like this:

[{
"id": "2d1781af-3a4c-4d7c-bd0c-e34b19da4e66",
"topic": "/subscriptions/xxxxxxxx-xxxx-xxxx-xxxx-xxxxxxxxxxxx",
"subject": "",
"data": {
"validationCode": "512d38b6-c7b8-40c8-89fe-f46f9e9622b6",
"validationUrl": "https://rp-eastus2.eventgrid.azure.net:553/eventsubscriptions/estest/validate?id=B2E34264-7D71-453A-B5FB-B62D0FDC85EE&t=2018-04-26T20:30:54.4538837Z&apiVersion=2018-05-01-preview&token=1BNqCxBBSSE9OnNSfZM4%2b5H9zDegKMY6uJ%2fO2DFRkwQ%3d"
},
"eventType": "Microsoft.EventGrid.SubscriptionValidationEvent",
"eventTime": "2018-01-25T22:12:19.4556811Z",
"metadataVersion": "1",
"dataVersion": "1"
}]

We will have to return a successful HTTP response (HTTP 200 OK) with the validation code under the property, “validationResponse”

{
"validationResponse": "512d38b6-c7b8-40c8-89fe-f46f9e9622b6"
}

All this is described in Microsofts documentation, but how do we do this in a Powershell function? Here’s my modified version of the “hello world/name” example. As you see it grabs the post requests and if it is a validation event from Event Grid it will return an http 200 and the validation response. Copy the entire script in to your function and re-create the subscription in event grid.

Hopefully the subscription registered successfully. Time to play!

Grab the code example from part 1 and fire off an event, in the matter of seconds your function will fire. You can confirm that it’s working by looking at the log and output.

How cool isn’t this? I love that we can use our Ops skills and create true serverless, modern application infrastructure.


What’s next for our Pizza order example?

In my next post, I will share a few more code examples with multiple Azure Functions, sending events through event grid, from the introduction you know that these are the steps:

  1. Customer creates/orders a pizza online
  2. Send orderdata to event grid
  3. Azure function subscribe to the “new order” event
  4. Create a new event when pizza is in oven
  5. Post new event when pizza is cooked and ready for delivery
  6. Create a new event when pizza is sent to customer.

PS: I would like to create a simple GUI at some point, what tools should I use? I’m thinking either Powershell Universal Dashboard by Adam Driscoll or PowerApps. If you have other suggestions, let me know.
Share this:

  • Click to share on LinkedIn (Opens in new window) LinkedIn
  • Click to share on X (Opens in new window) X
  • Click to share on Reddit (Opens in new window) Reddit
Azure modern application infrastructure with event grid and azure functions Automation

Creating a serverless application with Powershell: Introduction

  • 08/05/201807/01/2025
  • by Martin Ehrnst

Welcome, fellow IT pro. You have found the blog series describing how you can create a serverless application infrastructure with Powershell.

If you consider your self being a ‘modern it pro’, you frequently solve complex tasks and automate your work using code. You know what Git is and have heard people talk about continuous integration. If you can relate, let’s label you a ‘modern it pro’.

When I develop solutions that challenge my knowledge, I often seek advice from our developers. (You know, those who are employed to ‘GIT commit’?) Usually they can share some light on the issue and point me in the right direction.
By developing our own solutions, we have a working proof-of-concept to handover to our developers when things grow too big or complex.

The original challenge

The challenge or scope for my POC was to streamline creation of Azure tenants for our customers. We required to create a tenant, assign subscriptions and do some configuration within Azure AD. Many of these steps was already solved with various scripts, but it is time to consolidate and automate the automation. We decided that we wanted to learn more around the integration and ‘serverless’ PAAS offerings available in Azure.
For the purpose of this blog series we are going to build a new application using the same techniques, in a smaller scale. To create our serverless application infrastructure, we make use of the following Azure offerings:

  • Azure Functions
  • Azure event grid
  • Azure Automation
  • Azure KeyVault

Pizza ordering

I bet you have worked a fair amount of overtime in your career, therefore eaten a lot of pizza as well. Let’s try to build a simple pizza order and delivery process using Event Grid as integration layer and multiple Azure Functions to process the order.

We will break the pizza order and delivery process in to the following steps:

  1. Customer creates/orders a pizza online
  2. Send orderdata to event grid
  3. Azure function subscribe to the “new order” event
  4. Create a new event when pizza is in oven
  5. Post new event when pizza is cooked and ready for delivery
  6. Create a new event when pizza is sent to customer.

Parts in this blog series

  • Part one:  How to set up Event Grid and write custom events with Powershell.
  • Part two: Connect Azure Functions Powershell with Event Grid to complete the circle.

Share this:

  • Click to share on LinkedIn (Opens in new window) LinkedIn
  • Click to share on X (Opens in new window) X
  • Click to share on Reddit (Opens in new window) Reddit
Automation

Activate Webasto diesel heater using OMS and Azure functions

  • 03/10/201707/01/2025
  • by Martin Ehrnst

Looking at the above picture snow and winter is pretty awesome, but when you have to fire up your car outside your cabin in -15c (5f) you wish for summer. Not only is it extremely hard for your engine, but it’s also ridiculously cold to get inside the car! That’s why many cars in Norway are equipped with preheaters. A unit you can activate before starting or entering the car, heating up the engine (and in many cases the interior as well).
Just to put some numbers down, average temperature in Oslo January 2017 was -4.3, and coldest -12.6.

My child carrier, a Range Rover Sport, (one of Britains fines engineering that never fails) is equipped with a Webasto pre heater and controlled remotely by SMS command or an app. Communication is using WBUS, Webasto’s own language.

My goal in this post is to use data from the OMS Weather Data solution and Azure functions to automatically start my Webasto heater based on the observed temperature. I have to say, using the app directly way easier, but this is a very good opportunity to explore and play with cars, azure and automation.


Starting the heater

Many of these heaters and apps only communicate using SMS commands, but my heater controller can use internet connection as well, meaning there is an API of some sort it’s communicating with.

Using fiddler I found out how the app was communicating, replicating it using Powershell I ended up with this as a simple function to send commands to my heater. Typical commands are “cmd_heater_status” which asks for current status, and “cmd_time1:30,start” that starts the heater for 30 minutes.


To be honest, I wasn’t very pleased with the security here, but that’s something I will notify the company who make these controllers about.

Below is a typical output after requesting heater status.

heater : 1
gsm : 7
voltage : 12.0
h_temp : 25
flame : 0
date : 2017-10-1 19:13:9
valid : 1
status_date : 01/10
status_fdate : 01.10.2017
status_time : 21:13:09

Creating the Azure Function

After we have the basic functionality in place, we can add some logic to our script and create an Azure Function out of it. I have created a basic Powershell function below that accepts two input parameters. TempLow the temperature you have to be below to fire the heater, and heatingMinutes which is the number of minutes the heater will run.

The rest of the script is using our function above to request statuses and act upon our input and the heater response. I had to add sleep time within the script so that the Webasto controller had time process my commands.
Parameters like email-address and heaterId are defined as function environment variables


OMS / Log Analytics setup – query and alert.

Using data from the weather solution I created together with Cameron Fuller i created the following query to alert when observed temperature in Oslo is below a certain degree. This search is based on the new query language, Kusto. I reccommend everyone (including my self) to take a look at this Kusto cheet sheet.

YRno_CL | where LocationName_s == "Oslo" and TimeGenerated > ago(2h) | summarize AggregatedValue = avg(ObservedTemp_d) by bin(TimeGenerated, 15m), LocationName_s

Create an metric based alert based on the above query.

To kick off our Azure Function we set the alert to send a webhook with a custom json payload looking like this: (yes testing values)

{
"tempLow": "59",
"heatingMinutes": "40"
}

The test says webhook is sent successfully, and our function log confirms 🙂


Calm down John Snow, let winter come.


Share this:

  • Click to share on LinkedIn (Opens in new window) LinkedIn
  • Click to share on X (Opens in new window) X
  • Click to share on Reddit (Opens in new window) Reddit

Posts pagination

1 2 3

Popular blog posts

  • Azure Application registrations, Enterprise Apps, and managed identities
  • Azure token from a custom app registration
  • Migrate from Azure DevOps to GitHub - what you need to know
  • Remediate Azure Policy with PowerShell
  • Creating Azure AD Application using Powershell

Categories

Automation Azure Azure Active Directory Azure Bicep Azure DevOps Azure Functions Azure Lighthouse Azure Logic Apps Azure Monitor Azure Policy Community Conferences CSP Monitoring DevOps GitHub Guest blogs Infrastructure As Code Kubernetes Microsoft CSP MPAuthoring OMS Operations Manager Podcast Powershell Uncategorised Windows Admin Center Windows Server

Follow Martin Ehrnst

  • X
  • LinkedIn

RSS feed RSS - Posts

RSS feed RSS - Comments

Microsoft Azure MVP

Martin Ehrnst Microsoft Azure MVP
Adatum.no use cookies to ensure that we give you the best experience on our website. If you continue to use this site we will assume that you are happy with it. Cookie Policy
Theme by Colorlib Powered by WordPress